

Cannot Connect Citibank Login (Checking & Credit Card) to More Than One QuickBooks Online Account at a Time.

Since QuickBooks Online started using OAuth to connect with Citibank, I can no longer sync with 2 separate QuickBooks Online accounts. After connecting to one QBO account, it disconnects from my 2nd QBO account. When I reconnect to my 2nd QBO account, it disconnects from the 1st one. I only have this problem with Citibank where it will authorize Intuit as an app to only one QuickBooks Online account at a time. This didn't happen with the older connection type.

I have other cards/accounts with Barclays Bank, Bank of America, Discover that I have connected in both QBO accounts that sync with no problems. I wish that QBO developers would talk to Citibank developers as if I call Citi, they say it's a QuickBooks problem and when I have contacted Intuit, they say it's a Citi problem. I can't believe that I am the only one with 2 QBO accounts (one for business and one for personal) that have the same Citibank accounts in both.
I was finally able to get in touch with someone from Citibank's social media team who was very helpful. Apparently, this is an old "known" issue that still hasn't been fixed by Citibank. They have taken my feedback and forwarded it on, but they said it probably won’t be fixed anytime soon. I would suggest that anyone else that is having the same issue contact Citibank so they can see how many users this is impacting and fix it. I used Twitter as my method of contacting them @AskCiti.
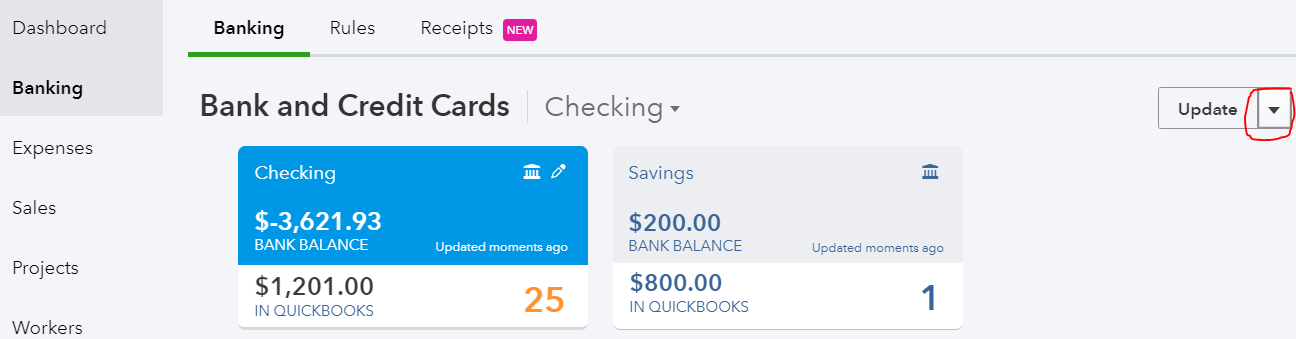
Essentially, Citibank has security settings that will only authorize QuickBooks Online as an app with access unique to one company ID at a time. And even though a new Citi connection uses the newer OAuth protocol, when the connection breaks, the message to Update now in QuickBooks Online implies that it was using the old bank type connection (see image). Citibank needs to be pressured to fix it so that multiple QBO accounts can have access to the same Citi accounts. I would pressure Intuit too to contact Citibank and let them know how to fix this issue, which should be pretty easy since all other banks are able to connect this way. I have a post on the QuickBooks Community that addresses this issue.


Not All Amex Charges Are Downloading Into QuickBooks?

When trying to connect an Amex credit card to QuickBooks in order to download a year’s worth of transactions (or other period longer than the default 90 days), not all of the transactions will appear in Banking (or the Bank Feed in QuickBooks Desktop). Hundreds of missing transactions is a big problem. This has been happening for years now and has not been fixed by Amex and it appears to happen with the business OPEN card, platinum or otherwise.
Solution:

In Banking, click on the pencil icon on the Amex tile and click on “Edit account info”.

Change the name so that you can use it again by adding additional text like “OLD” and check the box, “Disconnect this account on save.”

Go to Accounting on the left and Chart of Accounts. Click on the chevron (inverted v), and “Make inactive.” If you have already added a few transactions (the QuickBooks Balance column will show an amount, as highlighted), you will need to click on View register and delete all transactions before making the account inactive.

Go to Amex’s web site and log into your account. Click on Statements and Activity and click on the download icon in the upper right next to the printer icon and Select Transactions, inputting the date range of transactions needed.

Select export to CSV. Don’t try exporting to a Web Connect (.qbo file for QuickBooks) as this will still have the missing transactions.
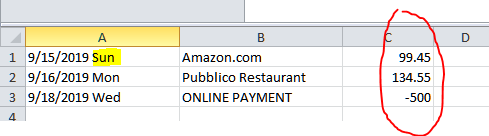
There are 2 problems with the exported CSV file that will need to be fixed. In the date column, Amex includes the 3-digit day. This will prevent the spreadsheet from being uploaded into QuickBooks. The other problem is that the signs for the amounts are reversed. Charges should show as negative and payments should be positive.

Open the CSV file in Excel (or other spreadsheet program). Click on the column with the dates and Find & Select on the Home tab and Replace.
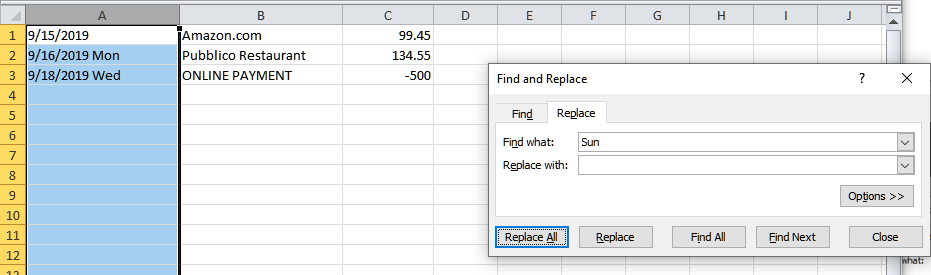
Enter each day of the week for “Find what:” and click on Replace All button, leaving “Replace with:” blank.
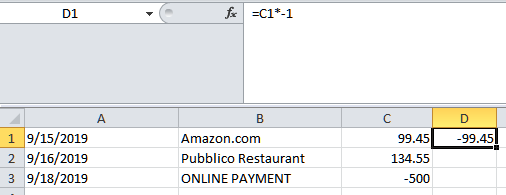
In the column next to the amount, enter = and cell with the amount on the first row and multiple (*) by -1.

Left click on the square in the lower right corner of the new cell and while holding down the mouse button, drag down to the last transaction.

Make note of which column has the correct amount (column #4 in this example) or add a header row and titles for each column, Date, Description, Amount. Save the spreadsheet and then Exit (X) out of Excel (Don’t Save on the 2nd prompt).
Back in QuickBooks, go to Banking and click on chevron next to Update and select File upload.

Select saved CSV file and click Next at the bottom.

Click chevron and select Add new.

Select Credit Card for Account Type and enter the Name previously used. Save and Close. Click Next.
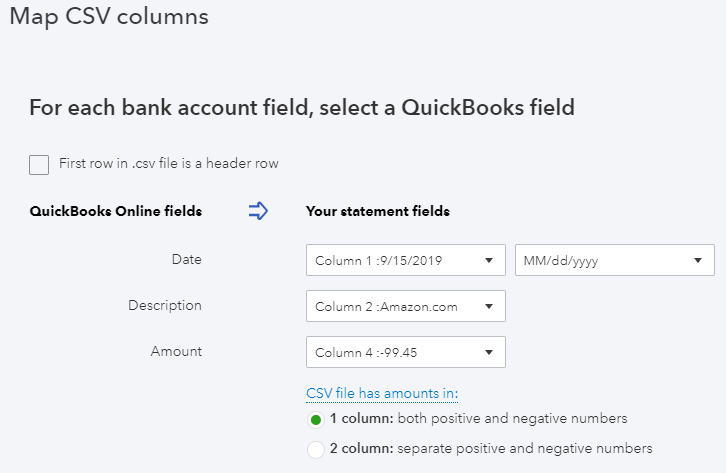
Map columns. Check the box at the top if you have added a header row to your spreadsheet. This will help in determining the correct Amount column to use. Click Next.

Verify transactions and click Next again and then click Yes. Click “Let’s go!” button.

Now you can add all the transactions to QuickBooks.

Unable to Download Web Connect File From AMEX
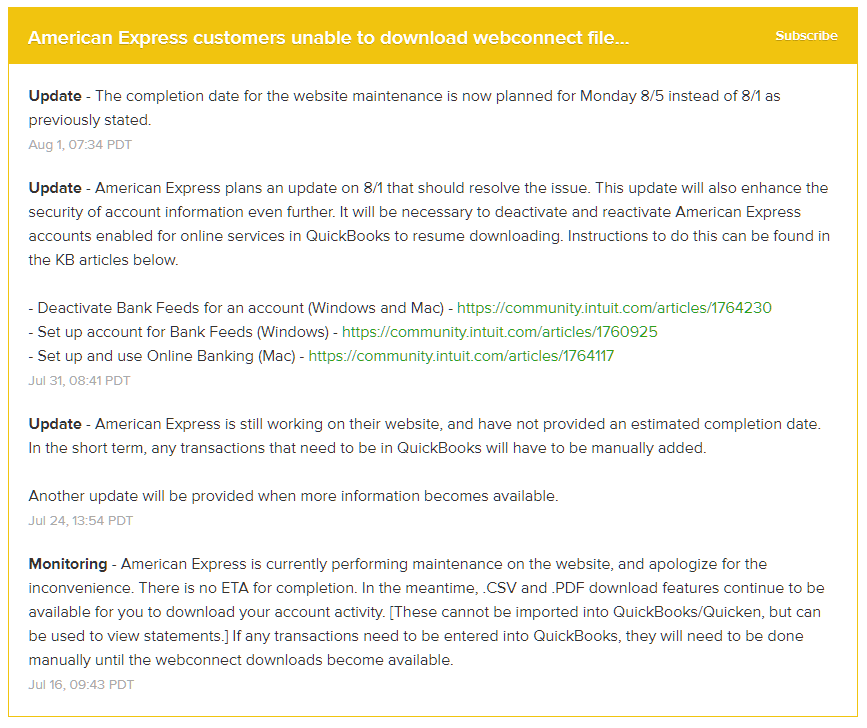
There has been an ongoing issue with being unable to download a web connect file from the website for AMEX transactions. This is probably impacting primarily QuickBooks Desktop users, but I have also seen issues with delays in getting new transactions to update in QuickBooks Online. To keep monitoring this issue you can subscribe via the following link: Intuit QuickBooks Status
This web page will also show you current slowdowns and outages with various QuickBooks products including QBs Payments and Payroll.
