

How To Refund Sales Tax Only with Automated Sales Tax On in QuickBooks Online

For businesses that have to collect sales tax, the automated sales tax in QuickBooks Online can make the process easier. The burden is no longer on the user to figure out if a transaction is taxable and what the correct rate is. When shipping product out of state, I have seen QuickBooks also determine economic nexus for sales tax and automatically calculate and add sales tax for certain states. Nexus refers to states that require sales tax even when shipped in from other states. However, the problem is that the collection of sales tax isn’t usually required unless a threshold is reached, for example, $200,000 or 100,000 transactions in a calendar or other yearly period determined by the state. If sales tax was collected on transactions when technically not required yet, the option is to either refund the sales tax to the customer or set up and pay the state agency.

So, let’s say QBO started collecting sales tax after shipping your product to Massachusetts. How would you go about refunding the amount collected to the customer after they had paid their invoice?
Create A Refund Receipt

Enter the same product and quantity that was on the original invoice and leave as taxable.
Enter the same product with a negative quantity and uncheck the Tax checkbox.
Refund the customer for only the amount of the sales tax.
Go to Sales Tax Settings and turn off (make inactive) the state agency so that tax isn’t collected going forward.
Unfortunately, at this time QuickBooks doesn’t keep track of the thresholds for all the different states. And since this changes constantly, with new states added to the list of those with nexus, it is still up to the business or accountant to keep informed of the requirements and monitor sales for each state for if and when a threshold is met. Of course, this is very complicated and such a huge burden for businesses. Hopefully, QBO will automate this process even further by incorporating the threshold requirements and add new states as necessary, similar to how tax tables and forms are updated continually with payroll.

How to Track Non-Taxable Sales in QuickBooks Online
Unlike in QuickBooks for Desktop (Windows), there is no Sales Tax Revenue report in QuickBooks Online. Furthermore, you can't have multiple non-taxable sales tax codes. A customer or product/service is either taxable or not based on a checkbox. This can be a problem for small businesses in states such as Arizona that has multiple localities where sales tax is reported separately from the state and non-taxable deductions have to be reported on their forms when filing.
However, there is a solution:
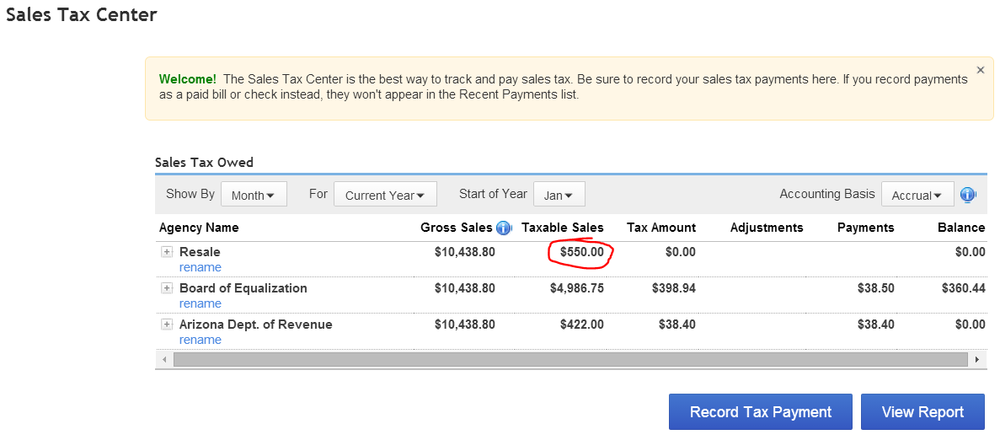
Create a new sales tax item called "Resale" with a zero percentage rate and create a new Agency called "Resale."

For all resale or tax-exempt customers, check the box for taxable and use the Resale sales tax code.

Record the sales receipt or invoice for your customers as you normally would.

In the Sales Tax Center, your resale non-taxable sales amount for the period is now easy to find.
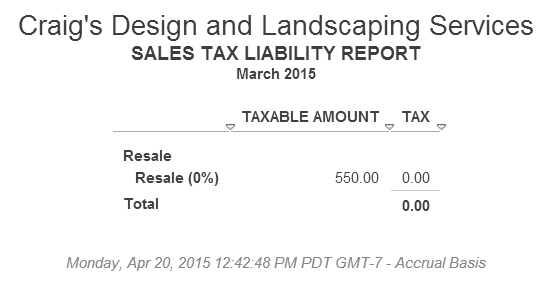
And in the Sales Tax Liability Report:
For non-taxable services, such as Labor, or products, such as Fuel or Oil, just create an item that is non-taxable.
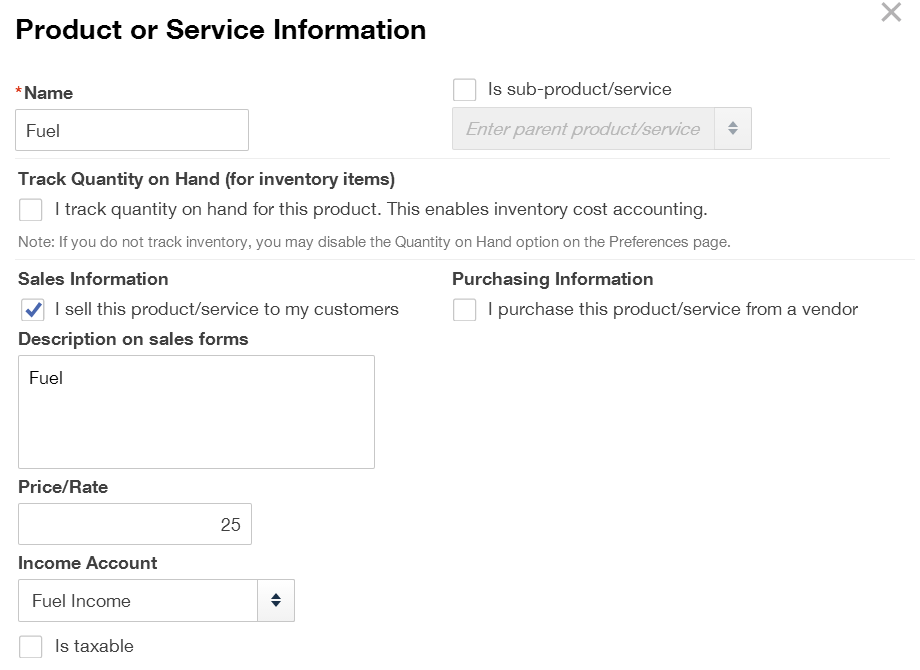
Whether the customer is taxable or resale, use the non-taxable products and services on sales transactions.

Run a Report for each non-taxable product and service for the tax period.

Or just run one and customize it by Transaction Date: Last Month and Group by Product/Service (for General), selecting all non-taxable items (for Rows/Columns), and Save Customizations.

Then when working on sales tax, just run this report and use the total amounts for each non-taxable product and service.

It is important that all customers have the taxable checkbox checked so that only the non-taxable products and services will tie in with the non-taxable sales.