

Not All Amex Charges Are Downloading Into QuickBooks?

When trying to connect an Amex credit card to QuickBooks in order to download a year’s worth of transactions (or other period longer than the default 90 days), not all of the transactions will appear in Banking (or the Bank Feed in QuickBooks Desktop). Hundreds of missing transactions is a big problem. This has been happening for years now and has not been fixed by Amex and it appears to happen with the business OPEN card, platinum or otherwise.
Solution:

In Banking, click on the pencil icon on the Amex tile and click on “Edit account info”.

Change the name so that you can use it again by adding additional text like “OLD” and check the box, “Disconnect this account on save.”

Go to Accounting on the left and Chart of Accounts. Click on the chevron (inverted v), and “Make inactive.” If you have already added a few transactions (the QuickBooks Balance column will show an amount, as highlighted), you will need to click on View register and delete all transactions before making the account inactive.

Go to Amex’s web site and log into your account. Click on Statements and Activity and click on the download icon in the upper right next to the printer icon and Select Transactions, inputting the date range of transactions needed.

Select export to CSV. Don’t try exporting to a Web Connect (.qbo file for QuickBooks) as this will still have the missing transactions.
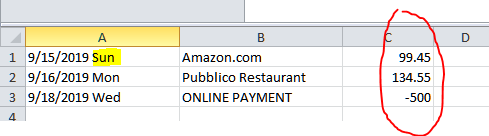
There are 2 problems with the exported CSV file that will need to be fixed. In the date column, Amex includes the 3-digit day. This will prevent the spreadsheet from being uploaded into QuickBooks. The other problem is that the signs for the amounts are reversed. Charges should show as negative and payments should be positive.

Open the CSV file in Excel (or other spreadsheet program). Click on the column with the dates and Find & Select on the Home tab and Replace.
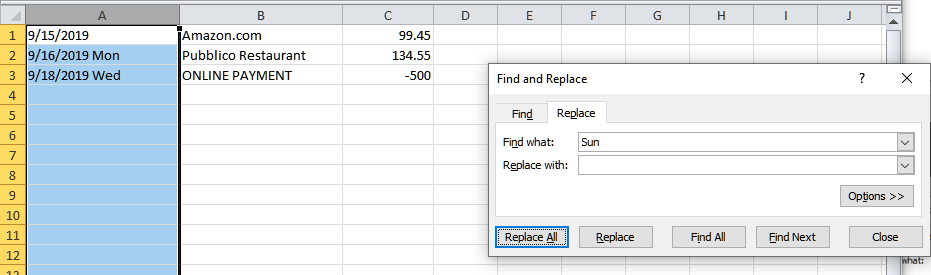
Enter each day of the week for “Find what:” and click on Replace All button, leaving “Replace with:” blank.
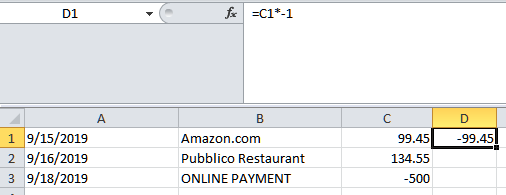
In the column next to the amount, enter = and cell with the amount on the first row and multiple (*) by -1.

Left click on the square in the lower right corner of the new cell and while holding down the mouse button, drag down to the last transaction.

Make note of which column has the correct amount (column #4 in this example) or add a header row and titles for each column, Date, Description, Amount. Save the spreadsheet and then Exit (X) out of Excel (Don’t Save on the 2nd prompt).
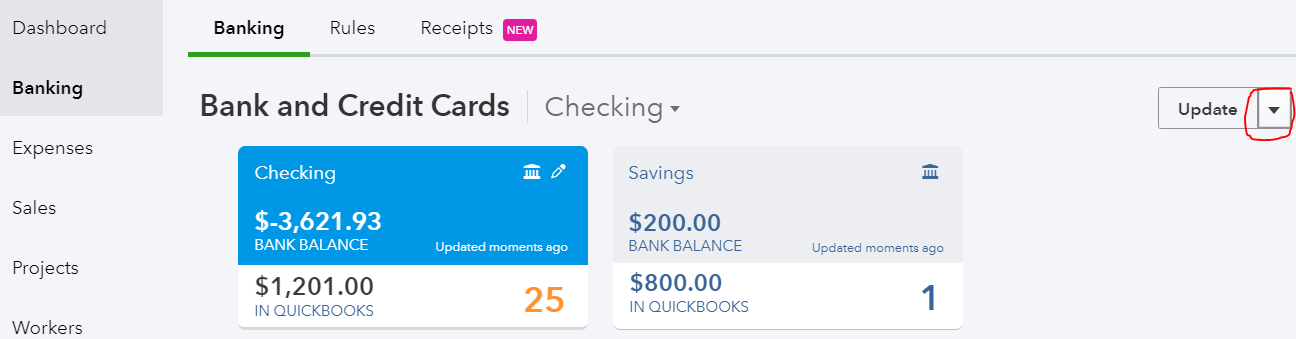
Back in QuickBooks, go to Banking and click on chevron next to Update and select File upload.

Select saved CSV file and click Next at the bottom.

Click chevron and select Add new.

Select Credit Card for Account Type and enter the Name previously used. Save and Close. Click Next.
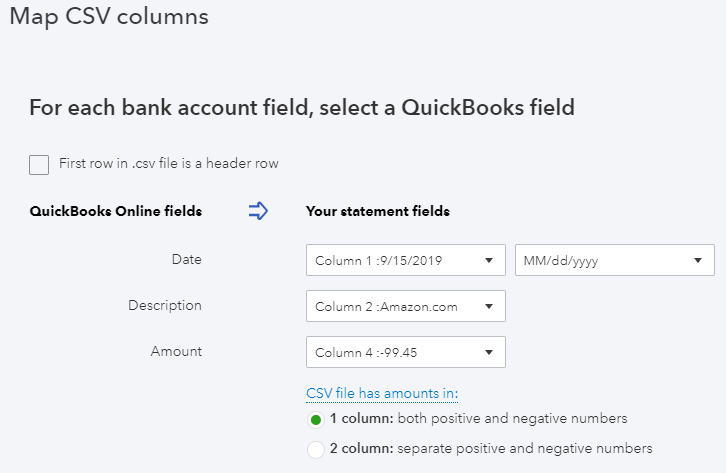
Map columns. Check the box at the top if you have added a header row to your spreadsheet. This will help in determining the correct Amount column to use. Click Next.

Verify transactions and click Next again and then click Yes. Click “Let’s go!” button.

Now you can add all the transactions to QuickBooks.

Unable to Download Web Connect File From AMEX
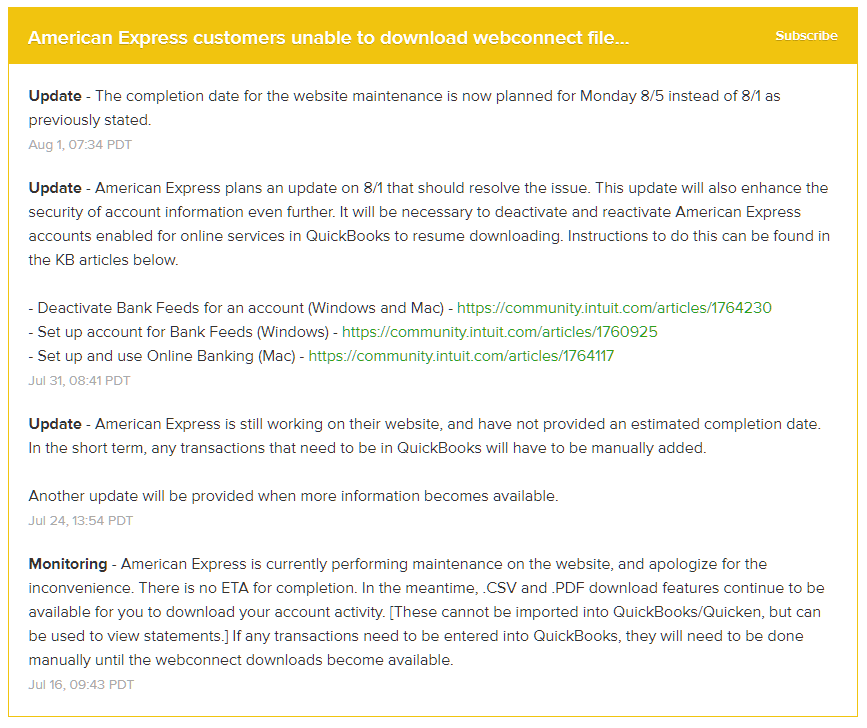
There has been an ongoing issue with being unable to download a web connect file from the website for AMEX transactions. This is probably impacting primarily QuickBooks Desktop users, but I have also seen issues with delays in getting new transactions to update in QuickBooks Online. To keep monitoring this issue you can subscribe via the following link: Intuit QuickBooks Status
This web page will also show you current slowdowns and outages with various QuickBooks products including QBs Payments and Payroll.


3 Essential Inventory Functions Needed in QuickBooks Online

With the “new” QuickBooks Advanced version I was expecting a slew of new functionality that would really differentiate it from the other versions (Essentials & Plus), instead of just capping lists and increasing users up to 25 (which we had anyway). A lot of businesses track inventory and QBO has this basic functionality. I have been very happy so far with being able to use FIFO valuation, Categories, SKUs, and now Price Rules for products. But more is desperately needed.

Essential Inventory Functions Needed Now
Sales Orders & Item Receipts
We already have the ability to copy from an Estimate to an Invoice in QBO. But we need the ability to have the sales order step in between the two. This will allow reporting on orders in progress and inventory allocated. It will also differentiate between quotes from sales people versus quotes actually turned into customer orders. It should just be as simple as copying the info from an estimate to a sales order and then the sales order can be copied to an invoice. Or course, additional templates will be needed for pick lists and packing slips.
On the purchasing side, we need Item Receipts. Unlike in desktop (except for Enhanced Receiving in QuickBooks Enterprise), these need to be separate transactions from bills, which currently add inventory to QBO. That way, the date of when items are received are retained when copying the info to a bill. And items receipts should post to Inventory Asset and a Received Inventory liability account. Then when converted to a bill, it just moves the dollar amount from Received Inventory to Accounts Payable for just the inventory items received.

Units of Measure
Since most distributors and wholesalers purchase their products in different units than how they are sold, being able to create units of measure conversions for each product is needed. For example, a product may be sold by the each but purchased by the case (of 12). Conversions should be easy to set up, unlike the multiple unit of measure sets that are so confusing in QBs desktop. So when adding a new product, I should be able to let QBO know what the base unit of measure is and what it is called (each, foot, box, etc.) and whether I use it for selling, purchasing, or both. Then, I should be able to create a conversion (case, roll, carton, etc.) and indicate how many of the base units are included. This way, I can show on a customer invoice the number of “each” sold and on a purchase order to a vendor, I can show how many are being ordered in a larger quantity (cases, pallets, etc.). Basic math is all that is needed here for QBO to calculate the Quantity on Hand for each product according the base unit of measure.

Multiple Locations
Controlling inventory requires some sort of organization. Warehouse workers have to know where to put received inventory and when to pick it from. This usually involves labeled sections, rows, bins, etc. Larger businesses may have more than one warehouse or have multiple trucks where they need to know how much inventory is in/on each one. Therefore, there needs to be a way to turn on multiple locations or sites with the ability to add bins or sublocations. Again, just the reporting will break out the total quantity on hand by location.
Currently, there are multiple 3rd-party apps that fill in the gaps of QBO with this functionality. However, the biggest problem I have with them is that they make you turn off inventory in QBO. This means that inventory items may show as Service items in QBO and there is no reporting such as an inventory valuation summary to compare with the inventory asset amount on the balance sheet. My guess is that these apps also sync with other accounting solutions such as Sage and Xero or can just be used alone, thus increasing the revenue reach for their developers. Therefore, they probably don’t want to integrate with just QuickBooks, especially if these features do eventually get implemented in QBO. I would rather have all my inventory in one platform and I am hoping that Intuit sees this as an immediate need to develop into QuickBooks Online.