

QuickBooks Error OL-332 When Updating Account in Bank Feeds

There are many reasons why you are not able to update a bank or credit card account set up with Direct Connect in QuickBooks Desktop. Some banks, such as Chase, require you to pay an additional monthly fee in order to download transactions within the bank feed (as opposed to going directly to the bank’s web site). Other steps to fix may include getting the latest QuickBooks update, rebuilding the company file, and even deactivating and re-adding the account in the bank feed. Unfortunately, none of these steps may solve the problem.

QuickBooks Desktop still uses Internet Explorer, specifically version 11 (32-bit), as a system requirement even for its latest version 2021. However, some banks no longer support this browser for online banking. For example, Chase Bank only supports Chrome, Safari, Firefox, and Microsoft Edge.

You cannot change the default browser that QuickBooks uses. However, you can change it in Windows and it will fix this problem.
Click on Windows icon in the lower left corner.
Type Default Apps and click on this system setting.
Click on IE icon under Web browser and choose another installed browser, such as Chrome.

Beware: New Banking Page in QuickBooks Online Confuses
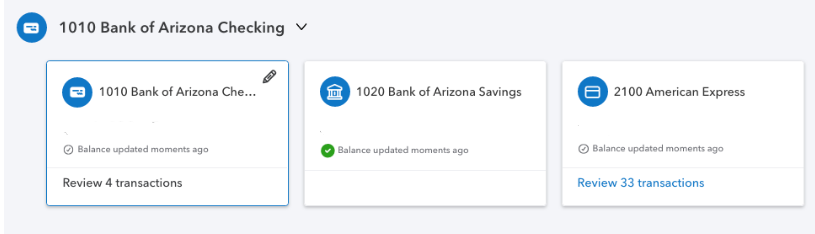
New Banking Page
What has changed
A couple of my clients have pointed out to me recent changes in their QuickBooks Online accounts that is causing confusion and dissatisfaction. Apparently, Intuit changed the look of their Banking page. Unfortunately, as a QuickBooks ProAdvisor, I was not made aware of this update and I participate in the monthly In The Know webinars on QuickBooks Online Updates.
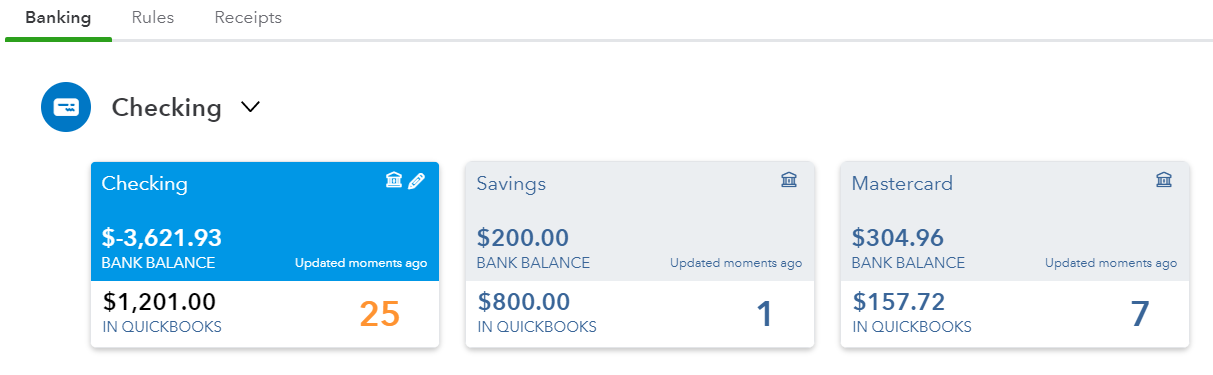
Old Banking Page
First off, the look of the bank and credit card tiles has changed. The font is a lot smaller; it is so much harder to read. What I have always loved about QBO over QuickBooks Desktop is the use of large fonts, so this is an unwelcome change.
The active tile is just outlined in a thin blue line instead of the having the Bank Balance info highlighted in blue.
The number of transactions to review is much smaller.
There is no differentiation between the In QuickBooks balance and the Bank Balance. It is not clear which balance is even being displayed here.
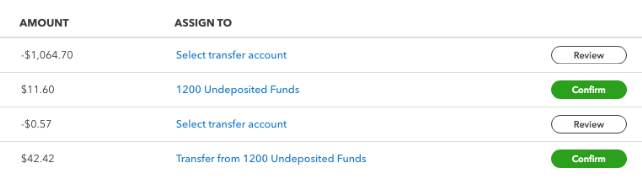
New For Review Grid
Seconly, under the tiles in the For Review section, there have been significant changes, too. While I like the bigger buttons in the Action column (notice how the column title has been removed), their new titles are confusing. The Confirm button especially will cause problems because the Assign To account suggested by QBO is probably wrong. The first reaction is to just click on this button when in reality, the downloaded transaction should be reviewed. I believe the Review button is suggesting an account previously used when adding a downloaded transaction. Both the Review and Confirm buttons really require the same actions from the user: to click and review the correct account, previously known as Add.

Old For Review Grid
Match has glaringly changed too. It has been replaced with the Review button with the number of records found under Category Or Match column, but not highlighted or outlined, making it easier to miss. The word Match made more sense because it confirmed that only one transaction already in QBs matches the one downloaded from the bank or credit card. The old action View meant that there was more than one transaction already in QBs and that you have to click on the transaction to view the drawer that shows the list of transactions that are potential matches to select from.
What you can do
It is not clear whether these are temporary changes or test situations imposed on a select group of accounts or indications of what updates are coming for all QBO accounts. If the latter, I suggest that all QBO users submit feedback to prevent these changes from being implemented. This can be done via the Gear icon and Feedback under Profile. For those accounts that already have these changes, I suggest submitting feedback also so that these updates get rolled back to the older version. Intuit takes feedback submitted this way very seriously.
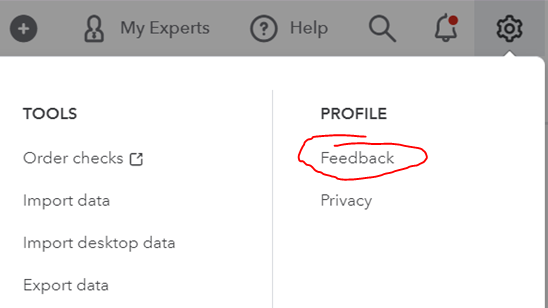
How to submit feedback

Not All Amex Charges Are Downloading Into QuickBooks?

When trying to connect an Amex credit card to QuickBooks in order to download a year’s worth of transactions (or other period longer than the default 90 days), not all of the transactions will appear in Banking (or the Bank Feed in QuickBooks Desktop). Hundreds of missing transactions is a big problem. This has been happening for years now and has not been fixed by Amex and it appears to happen with the business OPEN card, platinum or otherwise.
Solution:

In Banking, click on the pencil icon on the Amex tile and click on “Edit account info”.

Change the name so that you can use it again by adding additional text like “OLD” and check the box, “Disconnect this account on save.”

Go to Accounting on the left and Chart of Accounts. Click on the chevron (inverted v), and “Make inactive.” If you have already added a few transactions (the QuickBooks Balance column will show an amount, as highlighted), you will need to click on View register and delete all transactions before making the account inactive.

Go to Amex’s web site and log into your account. Click on Statements and Activity and click on the download icon in the upper right next to the printer icon and Select Transactions, inputting the date range of transactions needed.

Select export to CSV. Don’t try exporting to a Web Connect (.qbo file for QuickBooks) as this will still have the missing transactions.
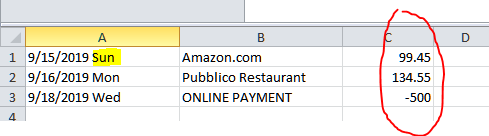
There are 2 problems with the exported CSV file that will need to be fixed. In the date column, Amex includes the 3-digit day. This will prevent the spreadsheet from being uploaded into QuickBooks. The other problem is that the signs for the amounts are reversed. Charges should show as negative and payments should be positive.

Open the CSV file in Excel (or other spreadsheet program). Click on the column with the dates and Find & Select on the Home tab and Replace.
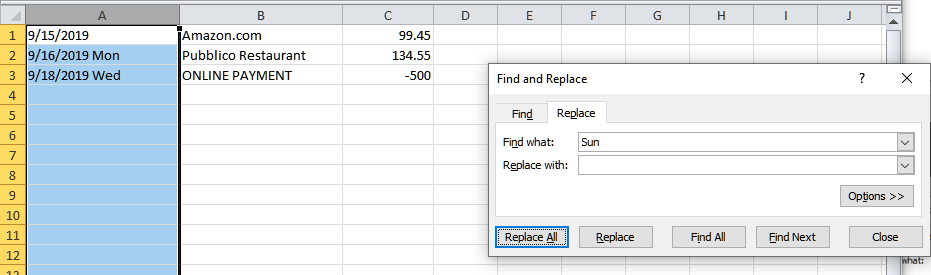
Enter each day of the week for “Find what:” and click on Replace All button, leaving “Replace with:” blank.
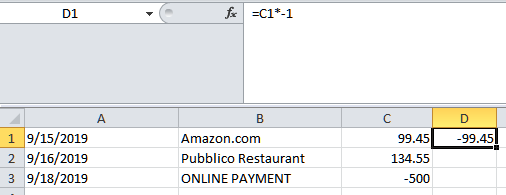
In the column next to the amount, enter = and cell with the amount on the first row and multiple (*) by -1.

Left click on the square in the lower right corner of the new cell and while holding down the mouse button, drag down to the last transaction.

Make note of which column has the correct amount (column #4 in this example) or add a header row and titles for each column, Date, Description, Amount. Save the spreadsheet and then Exit (X) out of Excel (Don’t Save on the 2nd prompt).
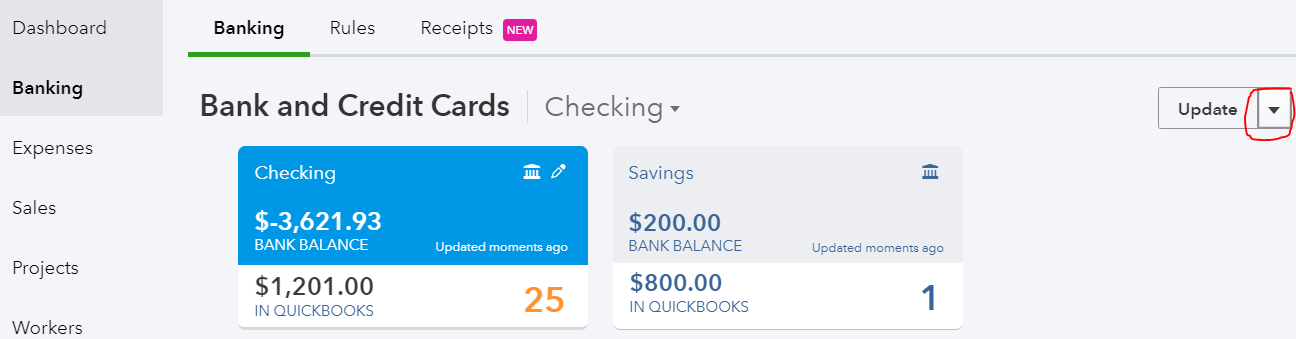
Back in QuickBooks, go to Banking and click on chevron next to Update and select File upload.

Select saved CSV file and click Next at the bottom.

Click chevron and select Add new.

Select Credit Card for Account Type and enter the Name previously used. Save and Close. Click Next.
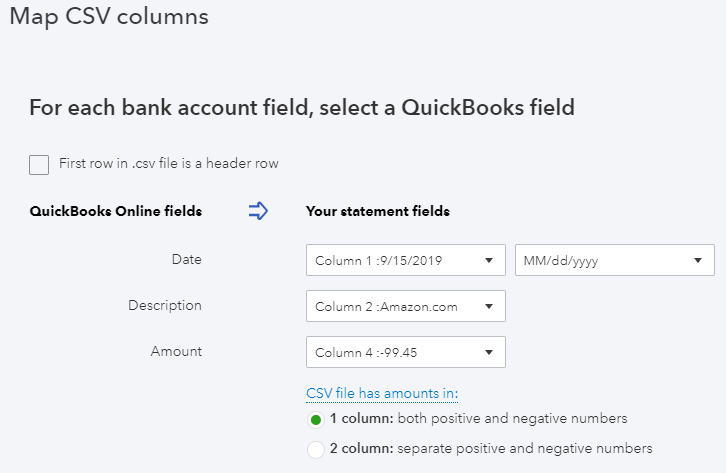
Map columns. Check the box at the top if you have added a header row to your spreadsheet. This will help in determining the correct Amount column to use. Click Next.

Verify transactions and click Next again and then click Yes. Click “Let’s go!” button.

Now you can add all the transactions to QuickBooks.